Boatyard | Greyhawk | latest | next | 2007-01 | previous | oldest
GREYHAWK
Mid-Winter 2007 Project Update
Note that some of these photos have a blue overcast color due to the blue tarp covering of the boat tent; the decks are really a dirty white to grey color.
Deck Re-Coring
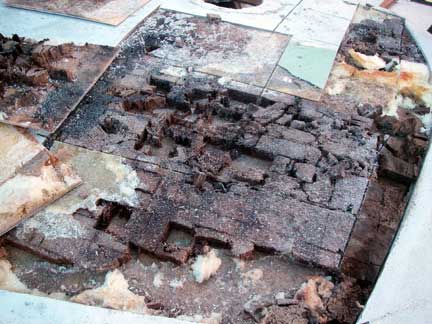
After stripping all the hardware off Greyhawk's decks in October, I began the deck re-coring project, starting with the worst areas, the forward end of the cabin trunk. I cut into the deck with my circular saw, set to cut through just the top skin. Once I had cut around a section, I would lift off the top skin, which sometimes entailed prying, chiselling, or cutting the section into smaller sections... Thus I exposed a lot of very rotten, very soggy balsa wood coring.

Efforts by
the previous owner at repairing the coring on the cabin house involved
the use of expanding foam (Great Stuff?) to fill in some rather limited
areas. This was wholly ineffective!
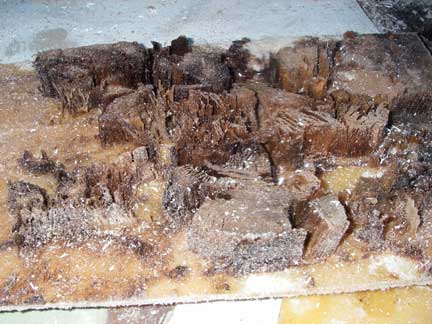
Often
the balsa was not adhered to either skin, but sometimes it came up with
the top skin.
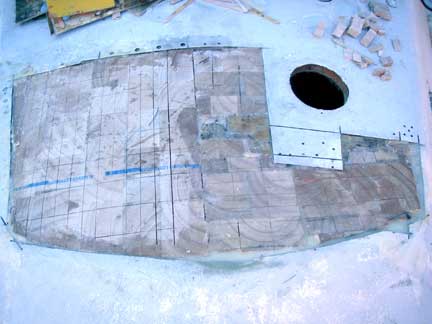
With the area opened up, I proceeded to remove all of the rotten and/or wet coring, using exploratory drilling to identify it's outer limits. I chiselled, scraped, ground, and sanded until it was all gone. Note that the coring was still dry and solid around the hole I cut in Spring 2006 for a solar ventilator over the head compartment.
![]()
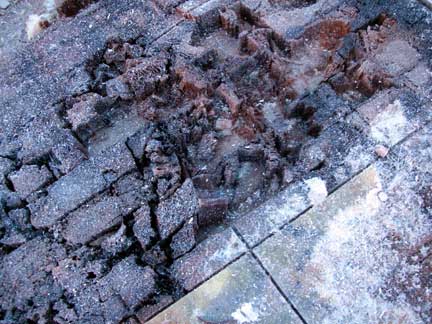
From below,
the inner skin is rather translucent without any coring, paint or
gelcoat!
After sanding everything smooth, and cleaning the area, I layed in some fiberglass cloth over some of the holes and weak spots, filled edges and gaps with thickened epoxy, and then glued sections of new balsa wood coring in place with more thickened epoxy.
I suspect that this forward part of the cabin got so bad due to a padeye at the forward end that was used for connecting a baby stay. The padeye did not have an adequate backing plate nor any tie rod, so the pull of the babystay lifted the whole area, promoting de-lamination and water intrusion.
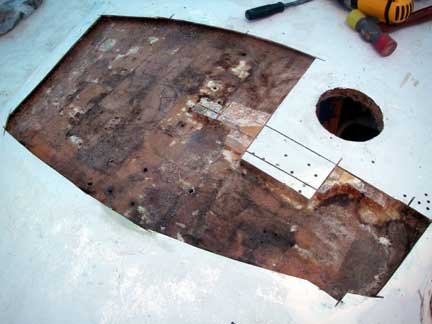
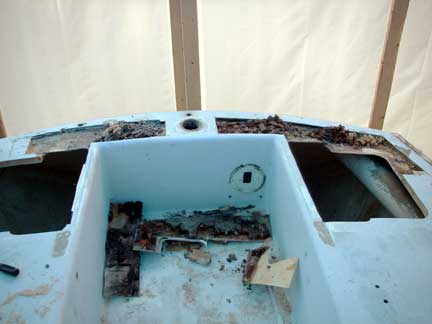
With everything set in place and filled, I turned my attention to the next worst area, the rear deck. Here, the checkstays were run to blocks blocks bolted through the deck, again without adequate backing plates. Again, the pull of the checkstays lifted the decks promoting de-lamination and water intrusion. In addition, there were numerous other fixtures attached here that could allow significant water intrusion. Furhtermore, the man-overboard horseshoe buoy wells were not particularly well-engineered, causing cracking of the deck and allowing more water intrusion.
The process here was much the same as at the forward end of the cabin trunk, but first I had to lay in place some bottom skin in the areas where the wells had been. I did this by using offcuts of the old top skin, and taping them in place with multiple layers of fiberglass tape and epoxy top and bottom. Then I sanded and cleaned, filled gaps and edges, and glued down new balsa wood as before.
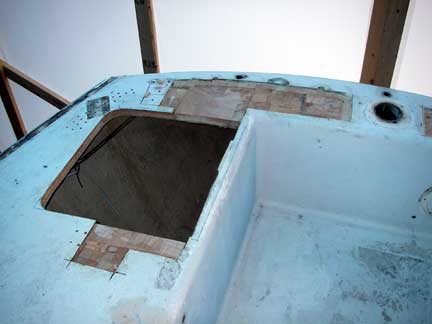
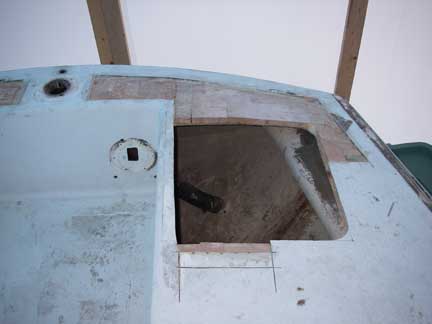
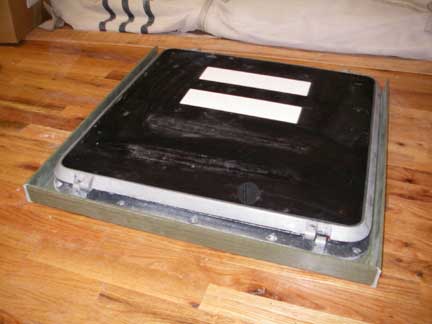
Recall that
the large holes are for new Lazarette
hatches.
There are still several other areas of bad coring that need to be
addressed, but the weather turned cold and other projects rose to the
top of the list. (It's hard to sound out areas of bad and wet core when
everything is frozen...). My plan is to excavate each area of bad core,
and put in the new balsa,for each area, in turn, but wait until I've
done the whole deck before laminating new top skins.
Heater
I installed the second-hand Force 10 Cozy Cabin D/K heater that my parents had given me as a "boatwarming" present. (ha ha, pun intended :). For starters, I used aluminum roof flashing as a heat shield against the bulkhead. Ultimatley, I'ld like to replace this with some stainless steel, but I don't think there's any huge hurry. I drilled a 2" hole through the deck where the 1" flue pipe will pass through. This area of the deck will require re-coring as well, so I haven't finished off the installation of the cap for the flue pipe yet. The pressure fuel tank sits neatly on the cabin sole under the heater (I still have to install the strap that holds the tank in place).
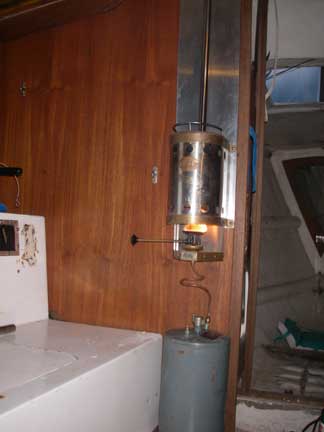

It works! All
in all, I think this will make the cabin quite cozy....
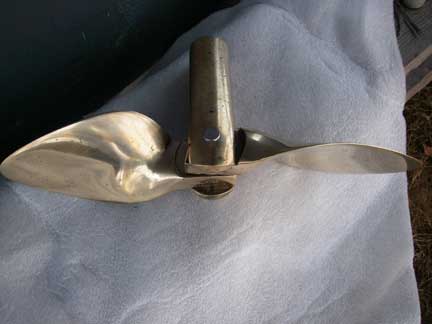
Propellor
I sent my folding propellor back to its maker, Martec, for their refurbishing service. They drilled out the pivot holes for a new oversized pivot pin, re-welded the blade stops that limit the blade movement, re-balanced the blades, and polished everything up nice and shiny. Here is a before picture to go with the afters:
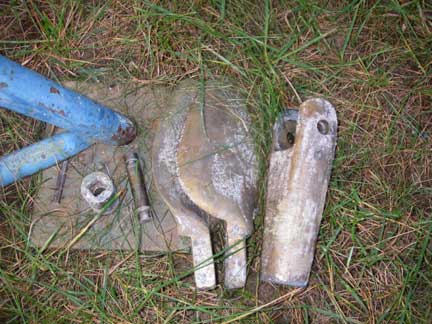
Here the
prop has been dis-assembled as part of the removal process.

I'm still working on removing the shaft (been drilling out the set
screws from the coupling), and have to re-set the shaft support strut,
as well as replace the hose on the stuffing box.
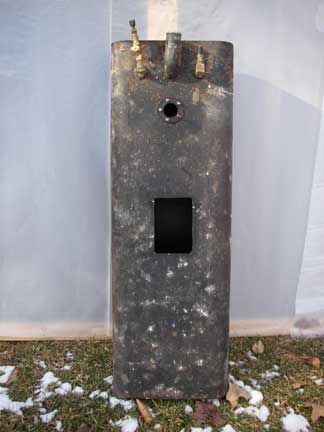
Fuel Tank
I decided to pull the fuel tank out for a thorough cleaning. In order to give it that, I cut an access hole through the top (after siphoning most of the fuel out). There was a bit of sludge, so it was a worthwhile exercise. I cleaned up the tank inside and out, and have begun work on fabricating a cover plate for the access hole. Eventually, I may replace this old coated aluminum tank (it was Renu'd some time ago) with a custom made plastic tank that makes better use of the space (12 gallons could be 16!). I will probably also add a second tank then, too, as I would like eventually to have about 25 to 30 gallons of installed capacity.
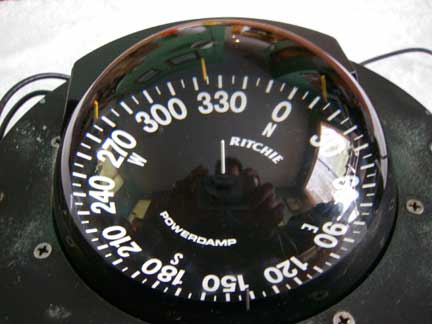
The boat came equipped with two Ritchie Globemaster F-500 flush deck mount compasses, one to port the other to starboard. On one of these the fluid was very hazy and discolored, and difficult if not impossible to read, especially at night, so I sent it off to Andrews Compass Service in Mattapoisett for rebuilding. It came back with a new card and dome as well as fresh fluid and a new light, so now it looks like a new compass. Here it is compared to what was the "good" one of my original two compasses. Now that "good" compass doesn't look so good anymore (just imagine how bad the bad one must have been!), so I've sent it off for rebuilding, too. My only regret is that the new compass card doesn't emphasize the points of the compass the way the old one did; but the numbers are much more readable, and I do steer to an azimuth (022 degrees) rather than points (N by NE).
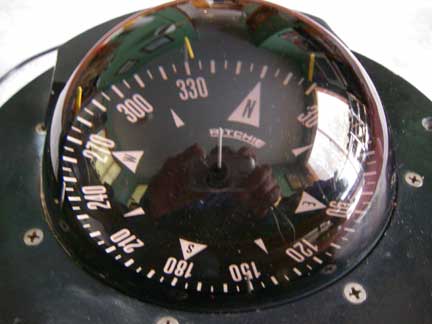
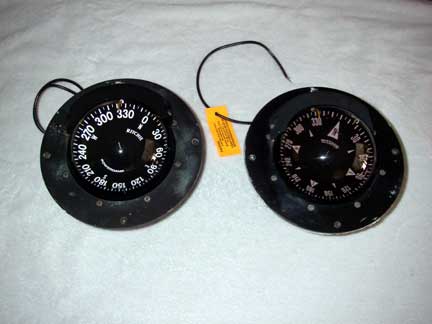
Side by Side comparison
I'll need to make some sort of covers for the compasses to protect
them from the Sun when the boat is not underway, as I think that lack of
such protection may have contributed to the aging of the old fluid and
cards.
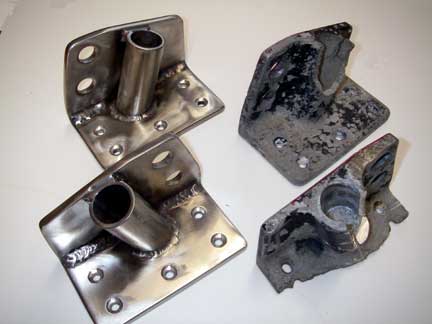
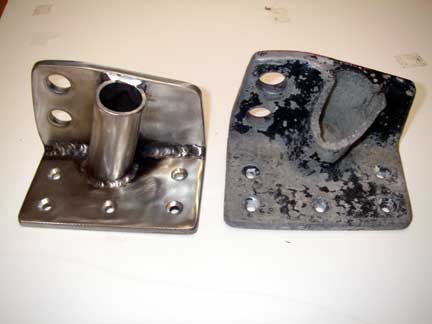
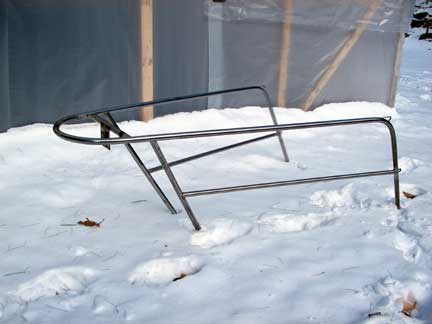
Pulpits
I took my bow and stern pulpits to East Coast Welding in Gilford, NH, who has some experience in marine stainless steel fabrication work. I had them add intermediate rails to the bow pulpit and tack on a bracket for the stern light to the stern pulpit. I also had them fabricate new bases for the stern pulpit to replace the old cast alumninum bases. Aluminum and stainless steel don't mix too well, so the old bases were falling apart. Here are new and old for comparison:
Meanwhile, I've ordered new lifelines from Chesapeake Rigging in
Annapolis, along with some other components for my
rig.
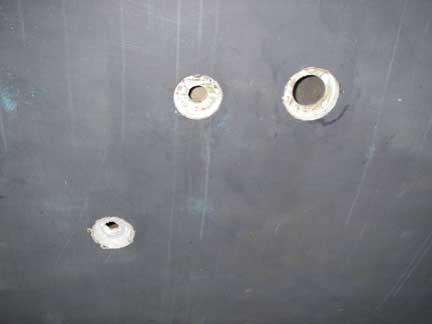
Thru-Hulls
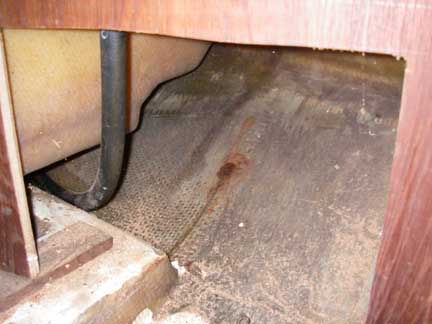
I've removed most of the thru-hulls from the boat, as many of them need new seacocks, and most of them need re-bedding. These included the two cockpit drains, the engine intake, an old instrument transducer, head discharge, sink drain, and toilet intake. The cockpit drains and head discharge were equipped with seized gate valves that will be replaced with Marelon seacocks. I will also be relocated the thru-hulls and seacocks for the head from under the settee and pilot berths, to a "newly discovered" space under the toilet, which should make them much more accessible!


Cockpit
drains before, and after removal.
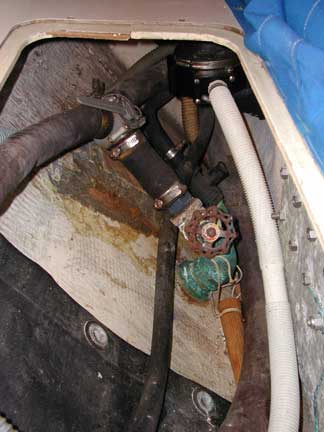
Head
discharge and toilet intake before, and after removal. Also shown is a
manual bilge pump, which I have rebuilt and will be re-installing.
Before, the intake and discharge hoses were just left loose; if needed,
you would throw the discharge hose out a hatch, put the intake hose down
into the water, and start pumping. I hope to install these hoses in a
more permanent, ready-to-use state, with the discharge side run to an
above the waterline thru-hull probably located near the transom.
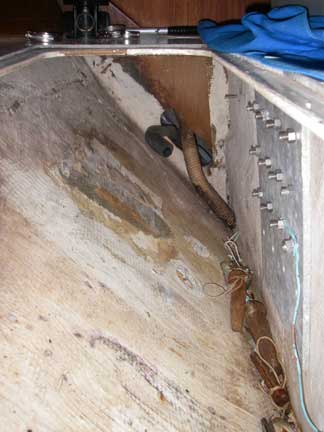
Here
are the Head discharge, toilet intake, and sink drain holes from the
outside, and the "new discovered" space underneath the toilet. I will
re-locate these thru-hulls and seacocks to this space under the toilet,
and glass over the old holes.
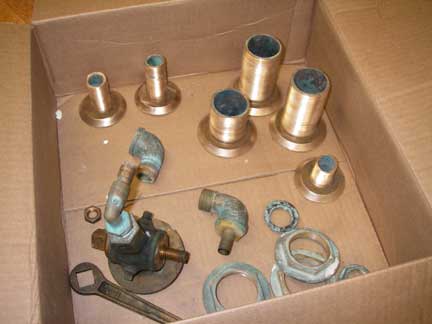
Meanwhile, I cleaned all the old grunge off the old thru-hulls with a wire wheel in my bench grinder. Also shown is the seacock for the engine intake. I'm in the process of fabricating new backing blocks for these thru-hulls out of 1/2" G10 Epoxy-Fiberglass Laminate (from McMaster-Carr), to replace the rotten old rings of plywood that were used originally. The G10 backing plates will be shaped and epoxied to the hull, and will make a nice flat surface upon which to mount the new seacocks, impervious to rot or corrosion.
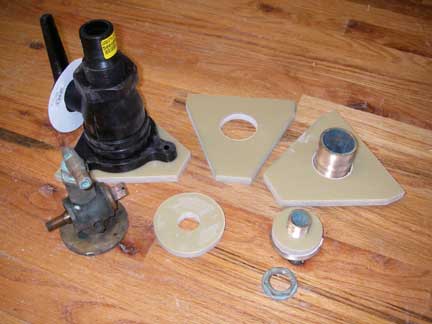
Three of my thu-hulls (cockpit
drains, head discharge) are 1-1/2" size, and they'll all be getting new
Marelon flange-mount seacocks. The backing plates for these had to be
large enough to accommodate the seacock's flange, so to maximize my
material use, I've cut them out as polygonal shapes. The rest of my
thru-hulls are 3/4" size, and most of those just had Marelon ball-valves
mounted to the end of the thru-hull, which is what I plan to do again. I
made these backing plates at least as big as the outside flange of the
thru-hull. With the extra thickness of the backing plate, and a nice
tight fit, I feel there is plenty of lateral support for these smaller
thru-hulls, and since they are all located in relatively protected areas
of the boat's interior, I'm not too worried about not having flanged
seacocks on these.
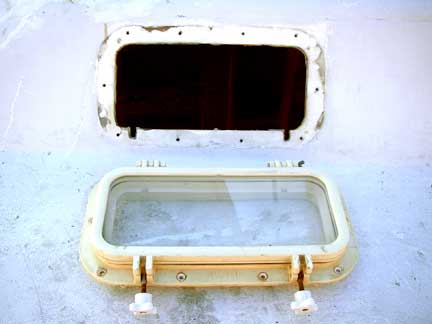
Hatch and Ports
I've built a "wavestop" for the forward hatch using pre-made fiberglass angle (from McMaster-Carr). They'll be epoxied down around the existing hatch opening, and then the hatch will be bedded on top of their horizontal flange. The purpose is to deflect waves crashing across the deck from impacting the gasket of the hatch, which hopefully will keep the boat a little drier. I got the idea from Beth Leonard's Voyager's Handbook. While at it, I have also replaced the very worn gasket. At some point, I will need to re-do the lexan in the cover, as well.

I would also like to replace the opening ports in the cabin. I will probably go with the plastic Beckson Newport RainDrain ports, as the sides of my cabin slope at about a 58 degree angle, and having the spigots drain properly is really important to us.
I replaced the non-skid treads on my companionway ladder:
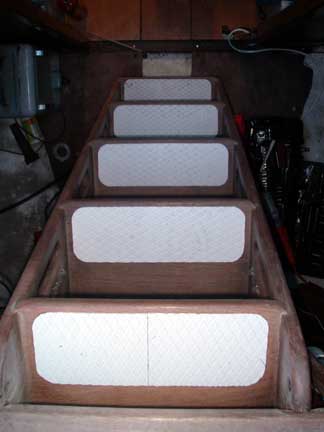
These I cut down from 8"x16" Treadmaster Step Pads I got at Annapolis
Performance Sailing. I was able to cut out four 4" x 12" pads from one
package of two step pads, and used the off cut ends to piece together
another 4"x12" pad for the fifth step of the ladder. Of course, I did
that to the top stop, which is the one most visible from the
companionway. Perhaps, I should have done it to the bottom step...
Rigging
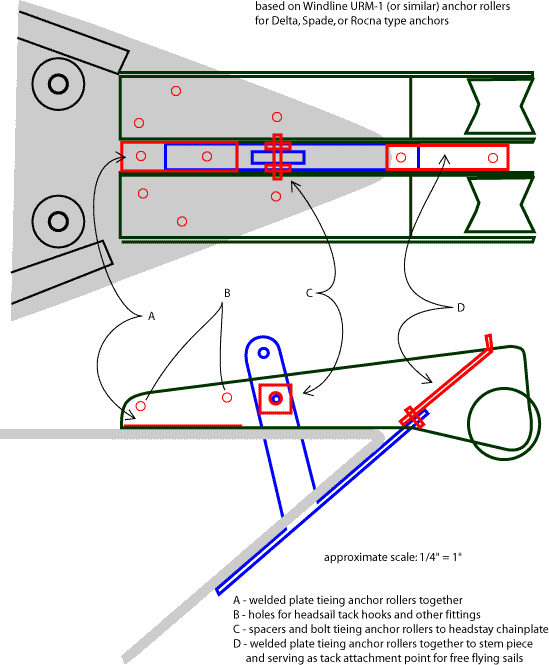
In the fall, I pulled the headstay and backstay chainplates. I think I've previously mentioned the need for a new bow fitting with anchor rollers, etc... Well, I've sent the chainplates down to my friends at Cheseapeake Rigging in Annapolis, and they're now fabricating new chainplates as well as an integrated bow fitting with anchor roller and a channel for a "prod" (a pole for tacking an asymmetric spinnaker or Code Zero ahead of the bow pulpit). The sketch below gives a general outline of what I have in mind:
After all the work done on the rig last year, with these new headstay and backstay chainplates, the entire standing rig, from chainplate bolts to masthead will be "new!" (With one exception: the failsafe turnbuckle between the backstay and the hydraulic adjuster)
Chesapeake Rigging will also be providing me with all the bits and pieces I need to finish installation of a new removable inner forestay supported by running backstays, as well as new deck organizers and rope clutches, lifelines (as mentioned above), and a new Tides Marine Strong Track for the mainsail (I'll have to install the hardware on the sail, of course, but I was planning to put slugs on in any case).
Boatyard | Greyhawk | latest | next | 2007-01 | previous | oldest
website by thorpeallen.net
January 2010