Boatyard | Greyhawk | latest | next | 2006-09 | previous | oldest
A Tall Tent for GREYHAWK
 |
|||
 |
 |
||
 |
 |
 |
|
 |
 |
 |
|
 |
 |
 |
 |
 |
 |
 |
|
 |
 |
 |
|
 |
 |
 |
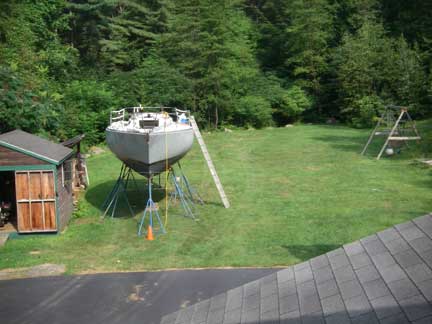
Now that GREYHAWK is resting comfortably in my yard, I need to erect a tent over her for the winter to protect her from the elements during phase 2 of the project -- mainly refurbishing the deck. Here's a view of her from a second story window of our house:
Note that the decks are over 10 feet off the ground, and I need to be able to work on top of them! FWIW, the boat's beam is 11'3"
I considered a metal-framed fabric-covered RV garage such as from Cover-It, ShelterKing, or ClearSpan, etc... (see red line in second drawing below). I also considered a Stimson Shed set up on 8' high knee-walls. In the end, I decided to erect a 2x4 lumber framed structure, to be covered in tarps and/or plastic sheeting. This was my initial quick section drawing for a lumber structure, 1/4" scale:
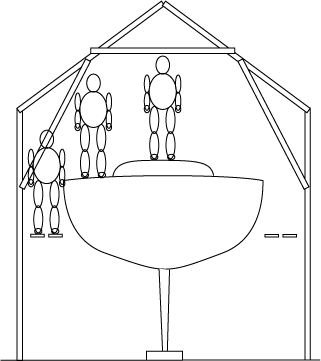
All lumber is shown as 2x4's (except the scaffolding planks); the studs are 14', rafters 10', bracing and collarties 8'. I envision 13 of these trusses, one every 3', tied together at the ridge, eaves, and base, and with lots of diagonal bracing, for a 36' long tent. Cables and stakes, too.
But I decided the posts on the left would be in the way of our access to firewood stored in the sheds to the left of the boat in the picture above, so I decided to extend the rafters over to the sheds, while still keeping the roof peak over the centerline of the boat. I also decided that I don't need full headroom over the cabin top, which will allow longer collar ties:
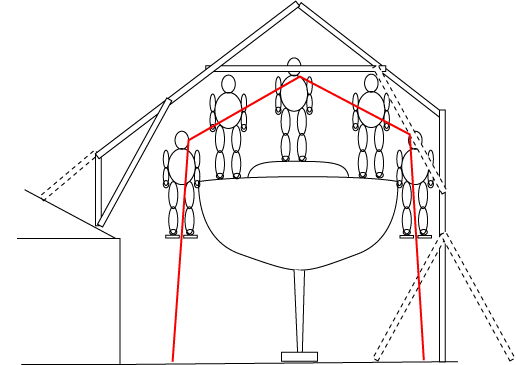
This design has a 14' high wall on the right, 12' high (on top of the sheds) to the left, 14' rafter to the left, 10' rafter to the right, and 10' collar tie. (The red line shows the approximate outline of a typical ShelterKing-type RV garage). The rafters are pitched at 9-in-12, or about 37 degrees. Hopefully snow will slip off pretty easily.
Note that I am calling this a "tent" rather than a shed. This is definitely intended to be just a temporary structure, to be taken down in about 9 months. I haven't told my city building inspector about it.... ;-)
Day 1
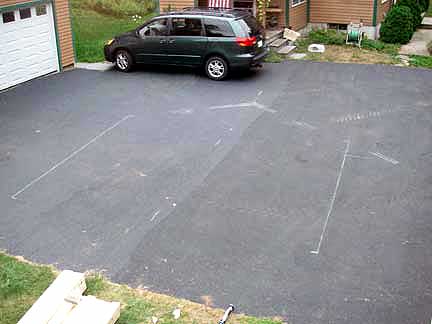
We began construction by lofting the structure at full scale (using actual pieces of lumber) on the driveway with sidewalk chalk:
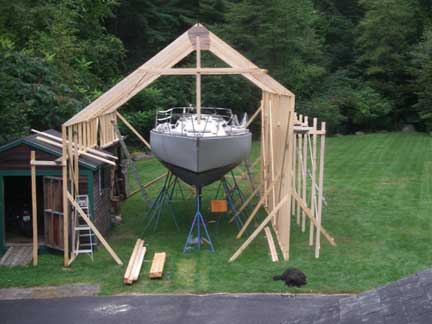
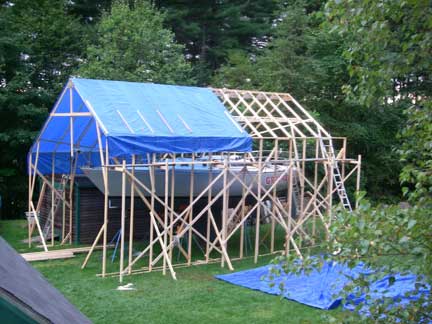
Then we assembled a full truss, including the legs, screwed it together, and attempted to hoist it upright with a rope from the bow of the boat. Unfortunatley, the connection between rafters and legs broke as we were tilting the truss up. So we needed a new plan. We decided to erect walls on the sides and then set the rafter trusses on top of them, as in more traditional stick framing.
You can see the proto-type roof truss on the pavement in the foreground.
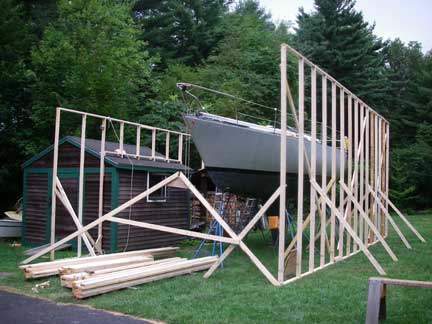
We raised the 14'-tall right wall in three sections, bracing each as we went, and then tied them together (at least at the bottoms). The studs (and the roof trusses) are spaced at 30 inches, except for the first and last which are at 36 inches.
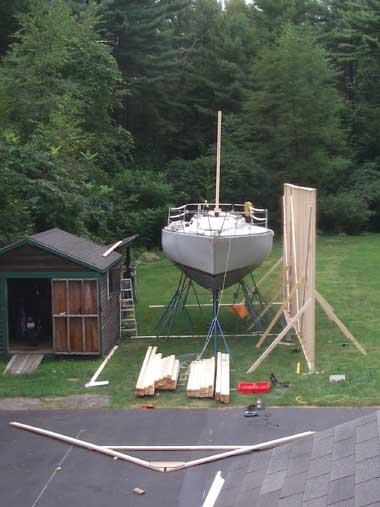
With the right wall up, we began work on the left wall, which rests upon and skirts around the two sheds (an enclosed garden shed in front, and an open fire-wood storage shed in the back). Lots of careful measuring to get the wall in the right place and at the right height. By the end of the first day, we had a start on the left wall:
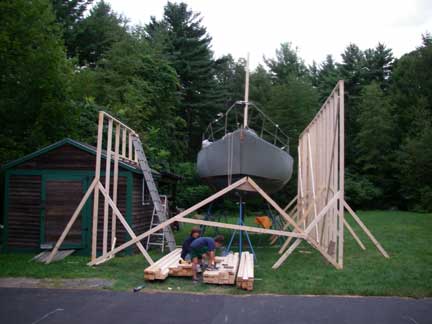
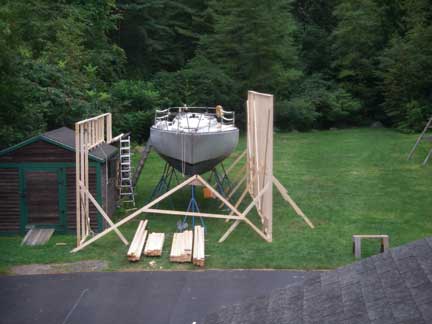
The proto-type roof truss is leaning up against the front of the two walls. Once the walls are done, we'll make up the remainder of these (15 in all) and then the plan is to lift them in place using gin poles from the deck of the boat. To finish the roof, we'll set up scaffolding brackets on the outside of the 14' tall right wall from which to work; we can work from the shed roofs on the left wall.
Day 2
We continued construction of the left wall, spanning the gap between the two sheds, again entailing much measurement and cogitation to get the wall in the right place and at the right height. By lunchtime, it had started to rain....
Day 3
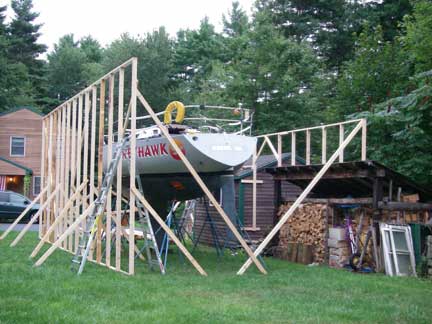
After work on Monday afternoon, I finished off the wall on top of the sheds:
Rather than run a stud down to the ground in the space between the two sheds, I used diagonal braces to help transfer the load to the the adjacent sheds.
Day 4
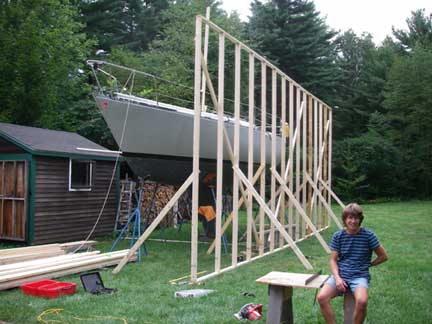
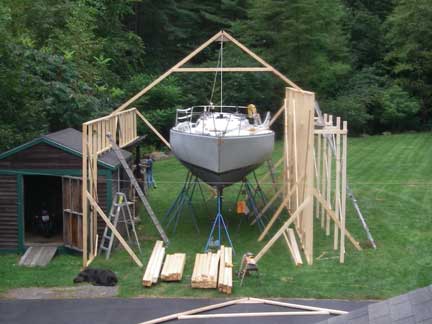
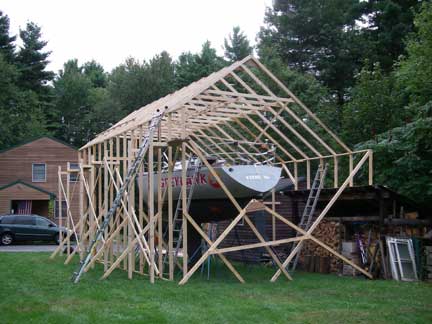
I came home from work around lunch time Friday to work on the "tent." I installed some additional bracing, and erected supports for a scaffolding along outside of the tall right wall, 3' down from the top. With that in place, I used the proto-type roof truss as a template to construct another truss, and then I raised the prototype up onto the boat to set it in place (after setting up ladders, etc...). While I was holding the truss in place, standing on the boat, my wife tied off the guy ropes to the boat's bow and stern cleats. Then I went and screwed the truss down to the left and right walls.
I spent the rest of the afternoon cutting gussetts and rafters, and assembling more trusses (now using the second truss as a template). Tomorrow, I'll try to raise all the trusses I've assembled so far, and make up the rest, before the remnants of Ernesto get here...
Day 5
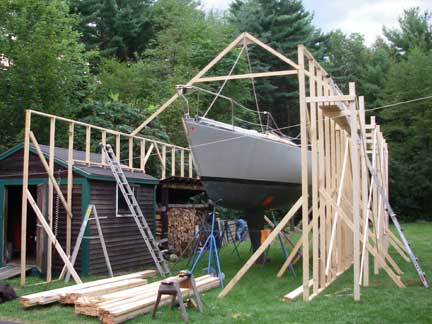
This morning I raised all the trusses I had made yesterday, and screwed them all in place. After tieing them together with some strapping, I made up the remaining trusses. After lunch, I raised all the remaining trusses, except the last one. Given the reverse transom of my 34' boat, there was no deck to stand on! Then I added some more strapping.
Once I get it all braced, we'll place some staging planks on top of the collar ties so that we can set the ridge pole in place.
Day 6
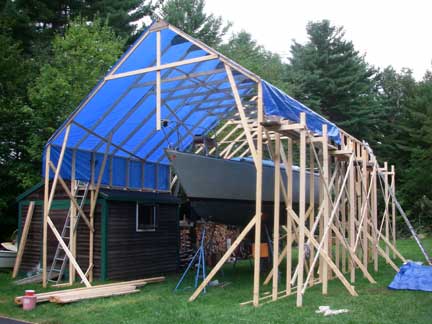
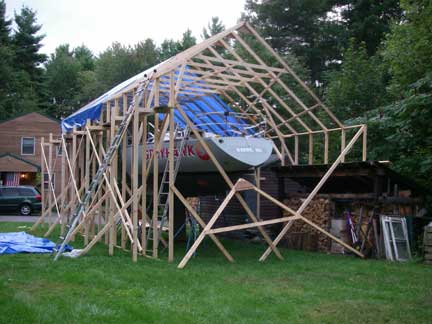
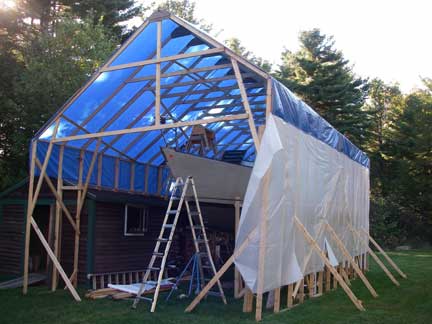
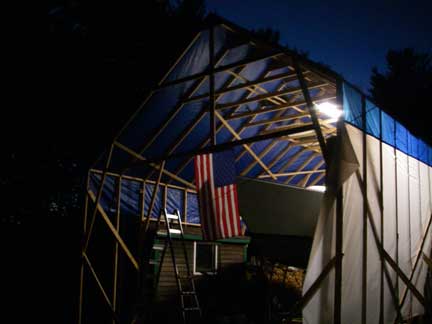
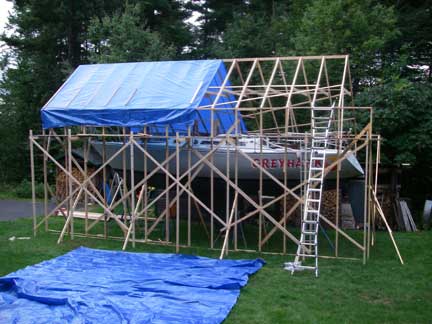
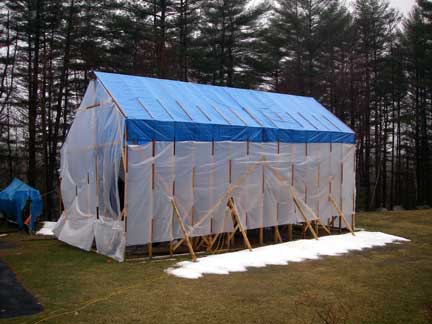
Added more braces and strapping, placed ridgepoles with help from Wendy, then pulled tarps over the top and secured them in place with battens screwed to the rafters:
Day 7
Wendy and I got the last roof truss in place by lifting one end up and lashing it in place, then lifting the other end up while Wendy kept the truss from tipping over using sticks and ropes while standing on the aft deck of the boat. Once I got the end up on top of the wall, I screwed it in place and secured some strapping to brace it. Then I went over to the other wall and screwed that end down and braced it. Finally, we pulled the blue tarp over this last truss and I finished battening that down. Finally, I took down the staging that had been erected outside the right wall so I could recycle that lumber elsewhere in the project.
Day 8
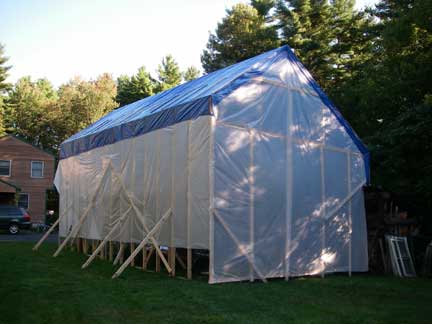
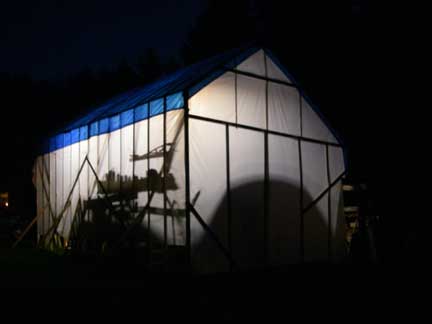
Installed some framing on the gable ends, particularly at the rear, and stapled up 6 mil plastic to enclose the rear and right side. I'll get to front sometime later (most of the weather comes at from the rear of the "tent" so that was the most important to get covered).
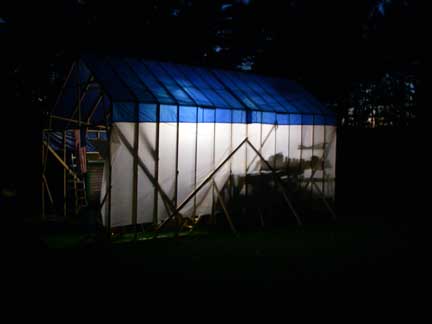
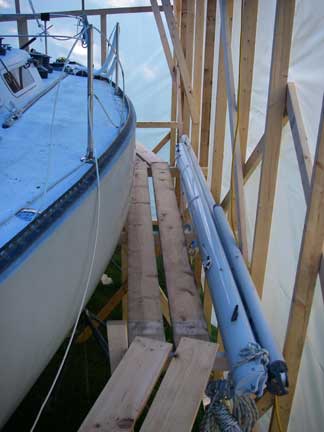
Also constructed some staging -- a wrap-around "dock" -- about seven feet off the ground all along the port side of the boat. This puts the toerail at belt-buckle height. I now need to construct a stairway for ease of access up to this "dock." For work on the starboard side of the boat, I will have to use ladders and some very tall horses to support the staging...
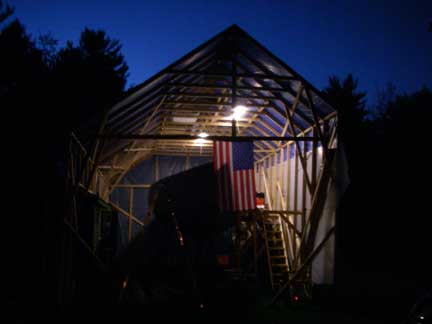
Finally, I've placed a couple of 4' flourescent shop lights (with electronic ballasts for cold weather starting) over the collar ties to illuminate the decks for working on the boat in late afternoons and evenings....
Another Day...
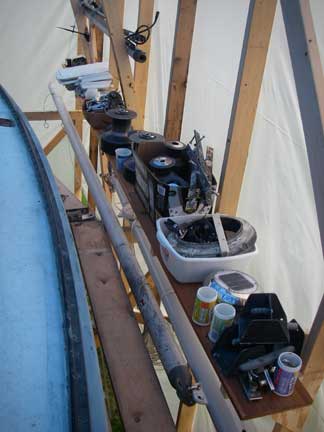
I installed a shelf along the right wall of the boat tent, just above the staging, as a place to store all the hardware taken from the deck. In addition, a lot of stuff like tracks, handrails, teak trim strips, etc... has been stored overhead on top of the collar ties.
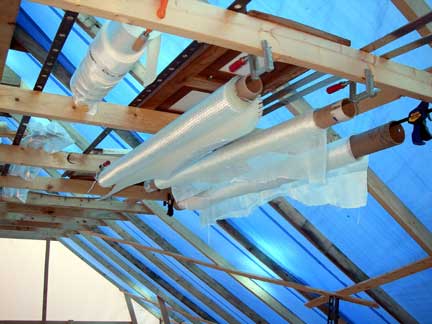
Rolls of fiberglass materials suspended from my overhead storage racks. The collar ties make for convenient storage of a lot of other things, too, like the genoa tracks, traveller, hand rails, hatches, pipe berth frames, etc...
April 16 Update
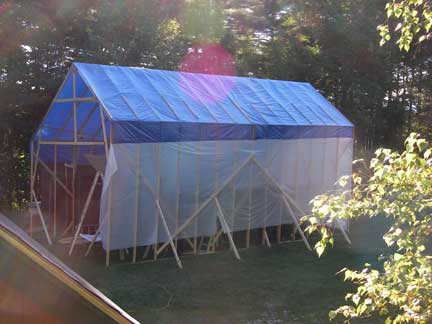
We experienced one of the worst storms of the year last night, and the tent is still standing tall. You can see that over the winter, I have had to add battens to keep the plastic sheeting attached.
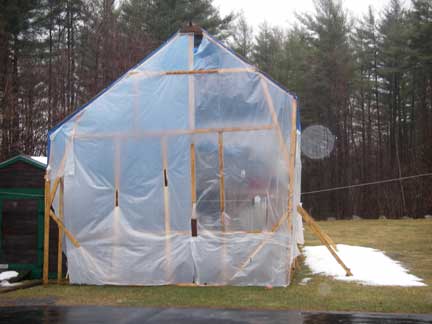
The tent does leak along the ridge pole, where the tarp appears to be wearing. Either that, or that's where humid air collects inside the tent and condensation forms, to drip down on the boat.
Boatyard | Greyhawk | latest | next | 2006-09 | previous | oldest
website by thorpeallen.net
January 2010