Boatyard | Greyhawk | latest | next | 2007-09 | previous | oldest
GREYHAWK's Refit - Continued
September 2007 Update
The last real update I published was in early June. Fortunately, just because I haven't posted any updates over the summer, that doesn't mean that there's been no progress. Still, we spent a fair bit of time this summer sailing, on our San Juan 21 QUASAR as well as OPB's. Two "big adventures" of the summer were helping my father-in-law deliver his Catalina-Morgan 440 from Annapolis up to Boothbay Harbor in early July, and then racing QUASAR in the Boothbay Harbor Yacht Club's annual regatta, taking the little boat further out than she's ever been before.
Much of the work this summer wasn't particulary photogenic, nor really all that visible. One of the big projects was fitting the anchor roller assembly to the bow, which entailed building up significant "shims" of fiberglass and thickened resin, and then fairing the mess to the deck and hull sides.
A lot of time and effort was spent puzzling over ideal hardware placements (such as where to mount the spinnaker pole storage chocks), and then drillin' an' fillin' all the holes for the fasteners. This entailed placing the hardware, drilling the fastener holes, over-drilling the holes through the top skin, excavating coring from between the skins beyond the over-drilled hole, taping off the bottom of the hole from the inside, injecting the hole with thickened epoxy until full, sanding that flush after curing, and then placing the hardware again and re-drilling the fastener holes for the hardware. Hatches, cleats, deck organizers, rope clutches, bow and stern pulpits, handrails, etc... One neat trick I'm pretty proud of was custom bending my new stainless steel handrails to fit the curve of the cabin house. I did this using a forked tree in the back yard, and they really came out nice. I'll get a good pic once they're mounted...
Then there was prep for painting, including sanding the whole deck with belt sander and random orbit sander, as well as getting all the corners and edges and fiddly bits by hand, and more fairing where necessary. Then vacuuming, washing with soap and water, and finally wiping down with solvent.
Finally a big change today: the first coat of high-build primer went on!
BEFORE | AFTER

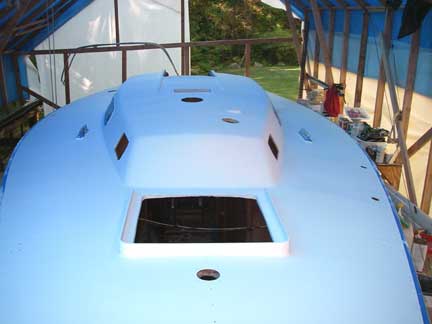
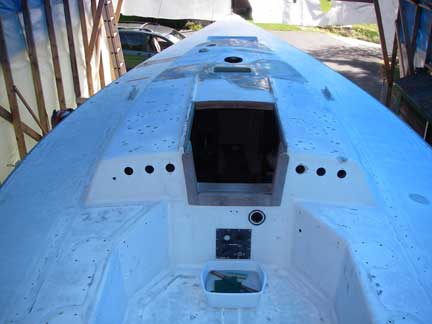
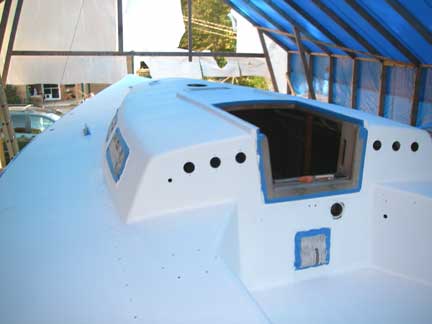
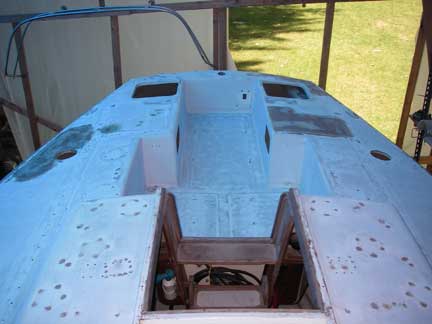
It's far from a perfect job, and needs sanding and another coat or two before finish paint, but man, what a difference! Woo Hoo!
The first coat of primer was rolled on with a standard 1/4" nap roller, and where the roller couldn't get I used a cheapo foam brush.
For subsequent primer coats and for the top coats, I plan to use a fine 3/16" nap mohair roller and probably badger hair brush.
I should probably point out that I think of my boat more as a sailing machine than as a fine yacht. I just hope to do a better job than the last time the deck was painted by a previous owner (runs and sags all over the place), but the Hinckley paint shop I am not! ;-) I'll be happy if there are no obvious blemishes when viewed from 10 or 20 feet away....
FYI, I'm using Pettit Easypoxy one-part paints, and Kiwi-Grip for the non-skid (which will get spread with their proprietary roller). For the areas that don't take non-skid, I'm currently planning to dull the Easypoxy down with their Satin Additive, as I don't like a deck that glares at me. The final color will be "Mist Gray" for the Easypoxy and "Gray" for the KiwiGrip.
FWIW, here's the rest of the color scheme: the mast and boom were done in "Whisper Gray" AwlGrip in 2006; the topsides are currently a medium sort of battleship gray color, and rather oxidized, with a black(?) bootstripe. There are red/orange vinyl graphics on the stern quaters (e.g. see my avatar). The hailing port on the transom was done in white vinyl. I have no immediate plans to paint the topsides, but that is something that might happen in the long term, at which time my wife would like to do something other than battleship gray. In the mean time, I will try to clean them up and polish them as best I can.
The previous owner used VC Offshore on the bottom (which comes in blue, black, and red) - he would put on a coat of red, wet sand that, then one of blue, wet sand that, and then mix what was left over in the cans and put that on (a sort of purple). He gave me a gallon of blue with the boat, so I'll be putting that on the bottom for starters. Still, I hear that you go much faster if you paint the keel and rudder orange....
Previous canvas work (e.g. mainsail cover) was a maroon red that sort-of matched the hull side graphics, and did match the bottoms and sides of the berth cushions. The tops of the berth cushions are grey with a cross hatch pattern in red. They are in good condition and actually look pretty nice. The lee clothes, pipe berths, and pipe berth cusions are all standard pacific blue sunbrella. I've go to make a new mainsail cover, and add a sun cover to the roller furling jib leach and foot, and make up some other canvas as well, for which I am considering going with (some version of) white. (I might line the mainsail cover with mylar space blankets to improve the UV protection, which is less with white sunbrella than with darker colors.)
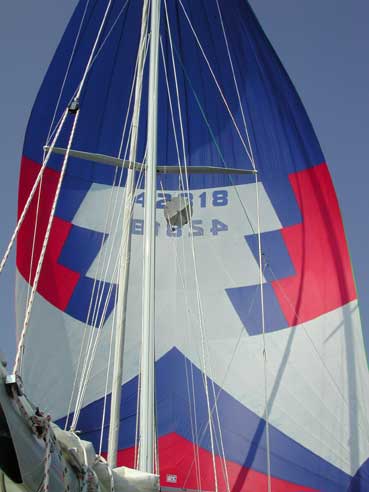
And for complete color disclosure, you should know that the 1.5 oz spinnaker is white, medium blue, and hot pink!, while the 0.75 oz chute is red, white and blue...
Greyhawk's Refit
Spinnaker Pole Placement?
August/September 2007
I want to do as much hole drilling and filling as I can before painting the decks, so now I'm trying to decide where to stow my spinnaker pole.
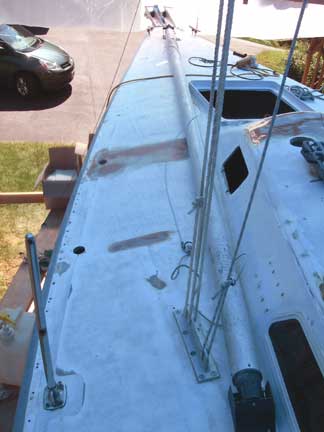
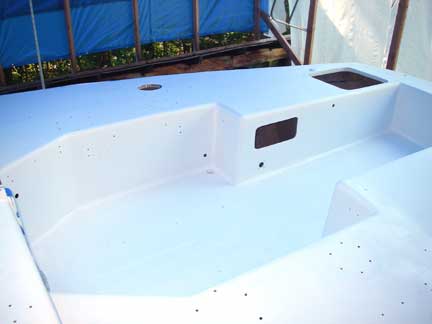
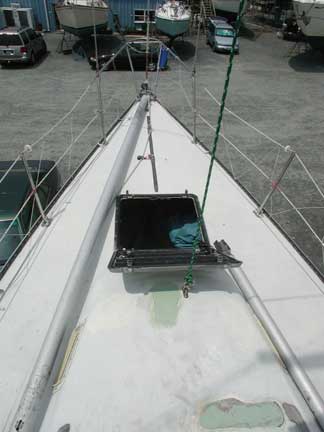
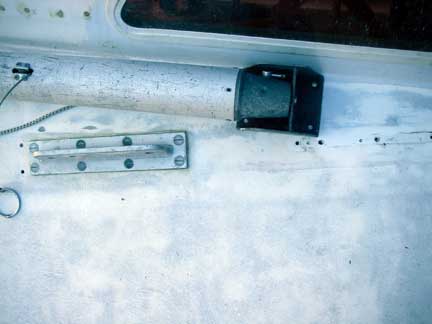
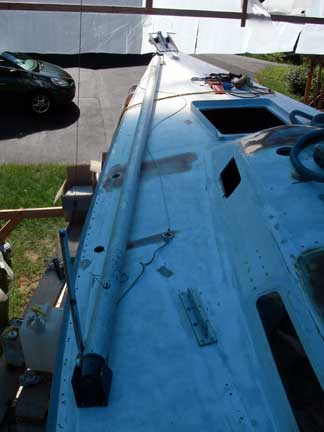
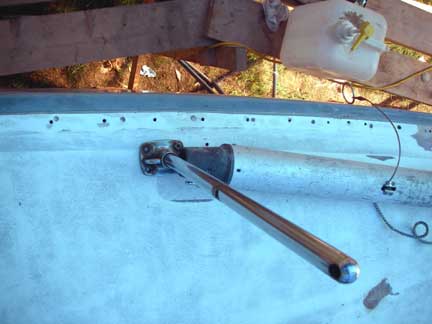
When I bought the boat, the working end of the pole was on a chock right behind the headstay, and the mast end on a chock mounted to the side of the cabin house. You can see it in the picture below. This was an inboard stowage position that I'ld never seen before (usually I've seen poles stowed along the rail just inside the lifeline stanchions).
I guess it had the advantages of minimizing how far one had to move the pole when setting it up, and of keeping the pole's weight closer to the center of the boat. It also keeps the side decks free of obstacles, until you get up to the bow, at which point it becomes something to hang onto! The one big problem with the arrangement was that it made access to the bow cleat very difficult (one had to release the pole from the forward chock in order to get to the cleat).
But now I'm adding an anchor roller assembly and a bigger cleat, so stuffing the end of the pole right up behind the headstay doesn't work any more.

But the inboard stowage position still intrigues me. So what would you do? (In both cases, the forward end of the pole would be in about the position shown above)
This: Inboard

Or this: Outboard
One thing I should perhaps have clarified is the intended use of the boat. We probably won't be doing a lot of short-course buoy racing, but may be doing some longer distance racing, perhaps shorthanded. And we'll be doing more cruising and passage-making than racing, anyway. So facilitating quick sets and drops when rounding marks is not a priority, and we probably won't have so many crew hiking out that they have to sit so far forward that they'll be sitting on the pole (if outboard). Rather, having a fair lead for anchor rode, mooring pennants, and docklines, and having quick access to the bow cleat(s) IS important.
One commentator raised a good point about having more than one bow cleat. So what about three bow cleats?
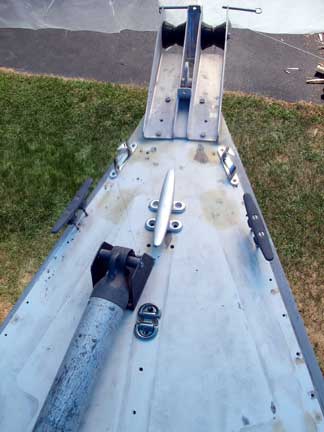
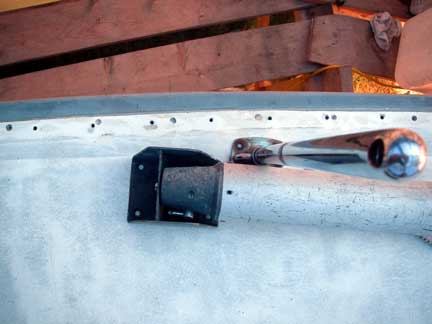
For one possibility, I would leave the 4-bolt 10-inch cleat in the middle where shown, and put a 2-bolt 8-inch cleat (the original equipment) out on the either side, right on the rail, somewhere a bit aft of the skene chocks. Actually, these would be in lieu of the slotted toerail, which I would cut short. The center cleat would be used for anchor rodes, mooring pennants, and forward dock lines, while the side cleats could be used for breast lines or spring lines.
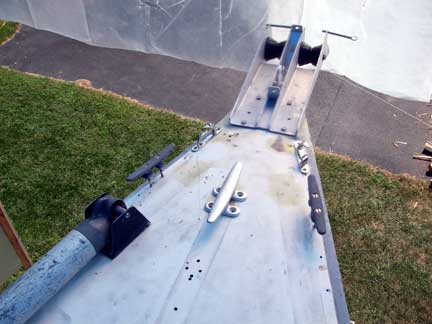
A couple of other things to note: (1) The forward supports for the bow pulpit come down just inside the skene chocks. They partially block the channels of the anchor rollers, but there is still plenty of room for the anchor shank, chain, and rode to pass. Unfortunately, there is not enough room for a pole to pass through one of the channels for use as a sprit. (2) The holes in the deck at the bottom center of the picture, aft of the cleat, are for a padeye that will support an inner forestay, and marks the forward end of a center track.
My bow is so narrow and pointy, there's just not a lot of room up there!
FWIW, the deck is glued and screwed over an inward hull flange, fiberglassed over on the inside, and then bolted together on 4" centers with the 1/4" machine screws that fasten the slotted aluminum toerail. Many, but not all, of the screws were removed when the toerail was bolted on. The bolts for the skene chocks and side cleats would substitute for the toerail bolts in holding the deck onto the hull in this area.
With respect to the spinnaker pole placement, keep in mind that the chainplates and shrouds are inboard, so the inboard pole position leaves the most room for passing the rigging, although I agree that it makes foot placement trickier on the foredeck. Here I've rigged some lines to simulate the shrouds:
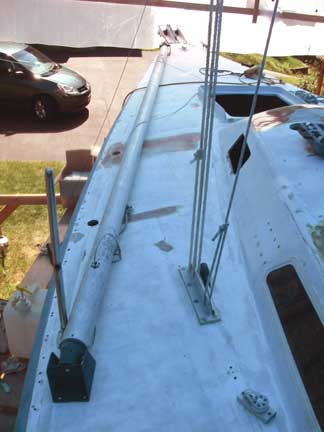
To really make the inboard placement work well, I think I need to move the forward chock inboard, until the pole just passes the deck hatch:
Of course up at the bow this makes things a bit tight. I can move the big cleat forward a bit, and upgrading to new-design deck chocks that appear to have a smaller footprint than my old chocks, might help too. With this inboard placement, I can't move the pole any further aft without interfering with the genoa tracks...
As an alternative for the outboard placement, I might be able to skooch the pole forward enough, and perhaps move the stanchion aft a bit, so that I could mount a togglepin directly to the stanchion to hold the socket end of the pole, doing away with the after deck chock, and moving the pole a bit further outboard (at least at the aft end), thus leaving the side deck more open for passage. A problem with this would be lining the pole up to get it on the pin, without the side walls of the chock. Also, skooching the pole forward would interfere with the side bow cleat on the port side....
As for storing the pole up against the mast, that would certainly be convenient. The drawbacks are the increased weight and windage aloft, which is of some concern to me. In addition, Forespar strongly recommends storing the pole on deck in heavy weather...
In the end I decided to try modifying the pole chocks a bit and went for an "inboard" placement. I think it will work out well. More pics once it is finally installed!